Router management interface. Remote access to the router via the Internet
They do not require regular intervention in their work. As a rule, it is enough to set them up once and after that they can work for as long as desired. But sometimes situations arise when it is necessary to urgently make changes to the router settings, for example, in order to change the WiFi password. In such a situation, the question arises of how to open the router settings. In this article we will talk about how to quickly and easily access your router settings.

A username and password are required to protect the router from changing settings by third parties. The standard login and password are indicated on the router box or in its instructions.
If you don't know what username and password to use, you can try the following options:
- Login: admin, password: admin;
- Login: admin password: empty line (password is not used, only login);
- Login: admin, password: 1234;
- Login: admin, password: 12345;
- Login: admin, password: password;
These login and password combinations are often used by router manufacturers as standard. As a last resort, if you cannot remember your login and password to access your browser settings, you can run. To do this, there is a small button recessed into the case on the back panel of the router.
After entering your login and password, the router settings (router web interface) will open in front of you.
Now, probably, even schoolchildren know that a router is a mini-computer and must be configured before using it. But with all this, not everyone knows how to go into the router settings. But really, how?! For beginners and housewives, this is completely “Chinese writing”, on a par with the inscriptions on the Egyptian pyramids! We will help you figure it all out! At least logging into the router won’t seem like such an abstruse activity for computer geeks. So, let's go!
The router's web interface and what it's used for
All settings of a modern Wi-Fi router are collected in one graphical interface, which is called the web interface or web configurator. Many users also call it “router website” or “router personal account.”

Although this is wrong, it is not without logic. The fact is that in order to go into the router settings, you need to use a regular web browser with which you surf the Internet - Chrome, Opera, Explorer or Firefox. So it turns out that you need to go to the router’s website to configure it, and the sequence of actions in order to enter the router settings is as simple as 5 kopecks.
192.168.0.1 or 192.168.1.1 - which address to use?!
So, great, we already realized that all this is easy and simple, but we haven’t yet figured out how to log into the router’s web interface. To do this, you need to know its IP address. How to recognize him?! Again, nothing complicated! Let's take this infernal piece of iron in our hands and turn it over! On the back there should be a sticker with a bunch of letters and numbers. There is a model, a serial number, and a bunch of other similar nonsense. Among all this riot of information, we need to find the IP address of the device. This is what it will look like on the sticker:

Typically, an IP address of either or is used to access the router settings. Less common are addresses 192.168.100.1, 192.168.8.1, 10.0.0.1 or some other. The username and password for logging in are usually indicated next to it. In the example in the picture this is the login admin and password admin.
Many modern network devices use a text, domain address instead of IP. Example - tplinkwifi.net for TP-Link routers, my.keenetic.net for Zyxel Keenetic, router.asus.com for ASUS routers.

There is no need to be scared - everything is the same, but in a slightly different form. Everything is used the same way - launch a web browser (Chrome, Opera, Firefox, IE, etc.) and enter either the IP address of the Wi-Fi router or its URL in the address bar. That's all!
Why can't I access my router settings?
As my experience tells me, very often problems with access to the web interface begin at the very first stage. And it seems like you’re doing everything correctly, the device is working, the lights are blinking, but for some reason you can’t enter the router settings. Not at all, from the word “at all.” What to do and how to be?! Let's find out!
1. The router’s website does not open
You enter the IP address of the router in the browser, and in response you receive the error “Page not found” or “Cannot access the site.”

There are several reasons for this. The most common one is simply device glitch- try rebooting it and checking the router settings again.
The second most popular reason is banal errors in writing the router address. You must write it in the address bar as it is written on the sticker. That is, 192.168.1.1 or 192.168.0.1. Users, as a rule, begin to be completely stupid, inventing something of their own. For example, they replace numbers with letters - like this: 192.168.l.l or 192.168.o.l - of course it won’t work like that! The IP address must consist of numbers, but the system will misunderstand letters! Sometimes they manage to forget about the dots in the address - 19216811, or add more parts - 192.168.0.1.1 - this will not work either.
Quite common problems with network card settings on a computer or laptop. The solution is also quite simple. Press the keys Win And R to open the Run window. Enter the open command in the line ncpa.cpl and press the “Enter” key, after which we will see a list of Windows network connections. Right-click on the one to which the router is connected and select “Properties”:

Then, as shown in the figure, double-click on the line “Internet Protocol version 4 (TCP/IPv4)” to open the third window - network connection properties. There we check the boxes to automatically obtain an IP address and DNS servers. This should be done in most cases, since the DHCP server should be enabled on the router by default and it distributes the IP, which means the computer should pick it up automatically!
If this does not help, try registering the IP on the network card statically. Like this:

This is in case the DHCP server on the network device is turned off or not working properly. If you suddenly receive the error “IP address conflict on the network”, enter a different address - 192.168.1.3, 192.168.1.4, etc.
If none of the advice I listed above helped, try this. Launch the command line and write the command in it:
Ping
That is, if the router has an address of 192.168.0.1, then the command will look like this:
Ping 192.168.0.1 -t
Press the “Enter” key to launch the Ping command. Thanks to the “-t” switch, packets will be sent continuously, and not in 4 requests, as is done by default. Next, you will need to try one by one to connect the patch cord coming from the computer to all ports of the router in turn.

The trick here is that modern routers can reassign LAN ports for different purposes - IPTV, SIP telephony, etc. You will not be able to access the router settings through such a port. That's why it's worth checking the other ports. As a rule, if the device is “live”, then it will respond on one of the ports.
2. The factory default password admin admin is not suitable
This is the most interesting situation. It usually occurs either among absent-minded people who forget everything, or among those who did not set up their own router or modem, leaving it in the hands of a third-party configurer or simply entrusting this process to friends, acquaintances, etc.

And the result in both cases is sad - it is not possible to enter the router settings using the default factory password and a login or password error is displayed. What to do? Unfortunately, in 999 cases out of a thousand, there is only one solution - reset the router settings. To do this, it has a special “Reset” button, which can be found on the back of the case, next to the connectors. It looks like this:

Resetting the router settings is usually quite simple - click “Reset” and hold it for 8-10 seconds. In this case, it is better to look at the front panel indicators. When they all light up at once or, on the contrary, go out, you need to release the button and wait for the device to boot normally. But ATTENTION!!!- after resetting the settings, your router will again look as if it had just been taken out of the box and unpacked. That is, for normal operation it will be necessary to configure it again. But the factory login admin and password admin will work again!
A router is a convenient solution for building a local and wireless network, allowing you to simultaneously access the Internet from several devices. However, to configure the router, you first need to install it correctly and go to the web interface, where the basic parameters of the equipment are indicated.
Connecting equipment
Before you go into the router settings, you need to install the equipment correctly. You will need:
- Router.
- Network cable.
- Network card on a computer.
Any user can handle installing a router - the main thing is to carefully inspect the ports and figure out what they are needed for. Explanatory inscriptions and different colors of connectors will help with this.
- The cable that the provider brought into the room is inserted into the WAN/Line/Internet port (usually it is blue).
- A network cable, which comes with the router, is installed in one of the LAN ports (mostly yellow). The second end of the patch cord is connected to the computer's network card.
- The power cable is installed in the appropriate connector.
Once all the wires are in place, press the power button. If everything is done correctly, several indicators on the router will light up: power, network connection and connection to the computer.
Setting up a router in the system
To open the router interface, you need to configure a network connection. Usually the necessary parameters are set automatically, but it would be a good idea to check that they are correct.

These are standard settings that allow the router to independently assign an address to the connected device (computer in this case) using a DHCP server.
Login to the interface
After connecting and configuring the equipment, you can proceed to resolving the issue of how to log into the router. On almost all routers, the interface address, login and password are indicated on a label located on the bottom of the device. 
If there is no sticker, then you can see the address for displaying the router’s web interface in the browser using software tools:
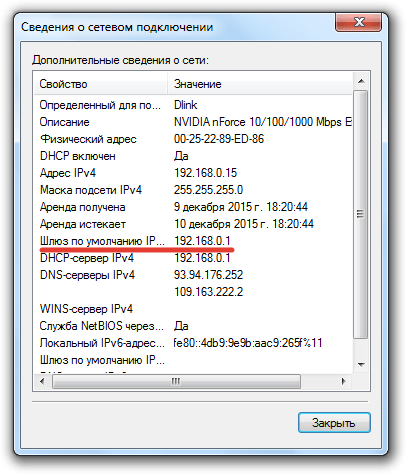
- Open Network and Sharing Center.
- Proceed to change adapter settings.
- Double-click the Local Area Connection icon.
- Click Details and look at the Default Gateway value.
If you changed your login and password yourself, but cannot remember the new values, then use the Reset button on the router to reset its settings to factory settings. After resetting the settings, the identification data will become standard - admin/admin.
It is not necessary to look at the router address. Most manufacturers use the same address, so the procedure for launching the interface of different router models is not very different.
For example, TP-Link and D-Link routers use the IP address 192.168.0.1. After entering this value, an authorization window appears in the address bar of the browser; you need to enter your login and password in it. For some models of D-Link Dir routers, you only need to specify a login; the password line can be left blank. 
Asus and Netgear routers have the default address 192.168.1.1. The login and password are also usually standard – admin/admin. But there may be options: for example, for the NETGEAR WGR614 router the login will be “admin” and the password will be “password”.
For Huawei routers, the login information is slightly different from the usual values. The address to enter the interface is 192.168.100.1. The login and password are also not quite standard - root and admin, respectively. Some models have even more complex pairs for authorization. 
Zyxel Keenetic routers have an easy-to-remember address my.keenetic.net. As an alternative, the standard address 192.168.1.1 is used. The login will be the word “admin”, and the password with standard settings will be 1234.
It seems like you can get confused, but in reality everything is simple. In 90% of cases the address will be 192.168.0.1. or 192.168.1.1, and the pair for authorization is admin/admin. If these values do not allow you to open the web interface, then read the instructions carefully - the address, login and password are always indicated there.
Possible login errors
If you cannot enter the router settings using automatic settings, then try setting the login parameters manually using the router’s IP address.

Knowing the router's IP address, you can manually specify the TCP/IPv4 protocol parameters:

To understand what values need to be specified, let’s take the router’s IP address - for example, 192.168.0.1. Based on this address, fill in the lines as follows:
- IP address – 192.168.0.2 (last digit must be in the range from 2 to 254).
- Subnet mask – 255.255.255.0 (always remains the same).
- The main gateway is 192.168.0.1 (the router address is indicated here).
- The preferred DNS is 192.168.0.1 (the router address is also written down).
With these settings, the problem of launching the router's web interface through a browser should be resolved. Then all you have to do is set up the Internet and create a wireless connection so that the Wi-Fi router begins to perform its functions of providing constant access to the network from different devices.
Any router requires configuration, the only exceptions are already configured routers issued by the provider as a bonus when concluding a contract. In this article we will consider such issues as the router web interface, user authorization, menu structure and basic settings.
Let us immediately note that some manufacturers write programs for easy configuration of their routers, the work of which boils down to almost automatic configuration of the device. It all comes down to the fact that the user connects the router to the computer, inserts the supplied CD, and the wizard performs the setup step by step, only occasionally asking the user for passwords, IP addresses and other necessary information specified in the agreement with the provider.
CD included with router
But this configuration method lacks all the subtleties of configuration; for this reason, we will consider a more complex, but more effective manual configuration method.
Connecting to a computer
Any configuration is carried out using a computer connected to the configured router by a computer network. The network can be built both wired and wireless using Wi-Fi, but wired is more preferable due to its high fault tolerance, and in certain moments this is very important. For example, when updating the firmware (firmware). If during the update the connection between the computer and the router is lost, then in most cases this ends with a trip to the store for a new router.
A wired network is created using a network cable patch cord, which is almost always included with the router. We connect one end of the wire to any LAN port of the router, the other end to the network card of the computer from which the configuration will be carried out.
For wireless communication, press the WPS button on the router (for some models it is called QSS), and the computer will make the connection itself.
Entering the router settings menu
Having connected the router to the computer, turn them on and wait for them to load. Next, open any web browser on your computer and enter the network address of the router in the address bar. The address can be found either in the included instructions for quickly installing the router, or from the sticker under the bottom of the router.

Sticker with the router address under the bottom of the device
The sticker also contains the name/login for entering the settings menu.

If the password and name are entered correctly, then we get to the web interface of the router. If an error is displayed, then the password has probably been changed and you need to reset the settings. This is done simply - each router is equipped with a reset button, located either on the back of the case or under the bottom. Press it and press for 10-15 seconds.
Attention! When resetting, absolutely all settings will be reset to factory settings, not just the name/password!
Settings menu
start page
So, we went to the settings menu. Next, we will look at this menu using the TP-Link WR740N router as an example, but it should be remembered that all other models from all manufacturers have approximately the same settings structure, that is, if you understand any router, then there should be no problems with others.
First of all, the start page opens, which displays the current status of the router and its connections.

Settings start page
At the top of the window we see the current hardware and firmware version. Below is the status of the local network, wireless network, wide area network and the traffic consumed.
Some more expensive routers have a slightly more informative start page, which displays the load on the processor, RAM, details of connected subscribers, and more.
Settings menu structure
Having understood the appearance of the settings menu, let’s consider its structure, since for settings you need to select an item. All settings topics are assigned to the corresponding items, selecting which opens a nested list of subitems.
For example, we need to configure the wireless part of the Wi-Fi network. We look at the left tree and find the corresponding settings item - “Wireless”, which translates as “Wireless Network”.

Basic Wi-Fi settings
By selecting an item, a submenu will open, divided into specific Wi-Fi settings. The first sub-item is the basic settings, in which you set the Wi-Fi name, region, channel, transmission speed, etc.

Wi-Fi Security Settings
The second submenu is used for wireless network security settings, in which you select the password encryption method and specify the password itself.
In the third submenu, you can configure filtering of computers by mac addresses (blacklist), in the fourth - advanced settings (for experienced users), in the fifth submenu - statistics of the wireless part.
Firmware update
Let's consider separately the issue related to updating the firmware of the router. The fact is that manufacturers, due to human factor, sometimes make errors in the firmware code, which leads to unstable operation of the router. And sometimes they add new functionality to the firmware, thereby providing the old router with new functions. And in any case, a firmware update is required.
Let's look at this point step by step:
- Go to the router settings menu, the “System Tools” menu, then to the “Firmware Upgrade” submenu.
The first step is to download the firmware file from the manufacturer’s official website. You can install unofficial firmware, but entirely at your own risk, the warranty is automatically void. We remember where we saved the file (conveniently on the desktop)

Firmware update
- Click the “Browse...” button and indicate to the explorer the path to the saved new firmware. At the same time, in the current window you can see the currently installed firmware version and once again make sure that you are installing a more recent version;
- Click the “Upgrade” button, after which the update process will begin.
As already mentioned, at this time it is extremely prohibited to turn off the router, pull out the network cable (with a wired connection) or turn off Wi-Fi (with a wireless connection), unless you want to end up with a “dead” piece of plastic.

The process of downloading and installing new firmware
The window will display the firmware installation process, which consists of several stages: first, downloading the file from the computer to the router’s memory, then installation. The entire process is displayed by an indicator scale with the percentage of the task completed.
After successful installation, the router will automatically reboot. Keep in mind that all settings from the previous firmware are not saved, this also applies to logins/passwords.
Other router models
For example, here is the settings menu for a router from another company – D-LINK.

Settings menu of another router
As you can see from the picture, there are no differences except the language, but this option depends on the firmware version, into which several translation languages are “sewn up”.
Setting a password for the interface of TP-Link routers:
To understand what this article is about, you need to understand the meaning of the word “Interface”. This word means the possibilities, ways and methods of interaction between two systems. The router interface is its connection, communication with something.
In our case there are two interfaces:
- One system is a person (user), the second system is the router itself. That is, the user needs to go into the router settings and make some changes there to make it work according to their requirements. This is the settings interface.
- One system is a computer network, the second system is again the router itself. That is, it must communicate with a computer network (in fact, this is what it was created for); for this, the router must have a connection to the network either via wires (LAN, WAN ports, etc.) or via Wi-Fi. This is the connection interface.
Let's take a closer look at both interfaces, and start with the settings.
Router settings interface
As we already understood, in order to configure the router, we must enter into a dialogue with it. That is, we give him a command, he hears us, understands, and carries out. The interface, that is, the intermediary between the user and the router, will be the most common web browser (IE, Firefox, Opera, etc.). This happens as follows.
We connect the router to the computer using a network patch cord, or via Wi-Fi, and launch a web browser. Any router has a network IP address - enter it into the address bar of the browser. For example – 192.168.1.1.
Login to router settings
It’s not difficult to find out the address of your particular router - either turn it over and read the IP on the label under the bottom, or in the instructions for setting up the router.

The IP address of the router is on the label under the bottom
We press “Enter”, and the router will immediately ask - who do I have the honor of communicating with? That is, authorization is required. The username and password are also indicated under the bottom of the router and in the manual. Enter them in the appropriate fields and enter the settings menu.
Router settings
After entering the settings, direct communication with the router and its configuration begins. For convenience for a person (but not for a computer or router), settings are made in a convenient menu, with items and sub-items.

Router settings window
All this “understandability” and “logicalness” of the menu is only needed by a person, and it really works - setting up the router is very easy and quick, even for a user with little experience. This indicates a user-friendly interface.
For example, we need to configure Wi-Fi.
Setting up a Wi-Fi router
Of course, we go to the “Wireless” menu item, which means wireless network.

Setting up a Wi-Fi router
In the window that opens, we configure the Wi-Fi network, nothing else. There is communication between the user and the router, mutual understanding, interface.
Network interface
Let's consider the second case of the interface, this time physical (previously it was interactive). Although at first glance there is nothing in common between them, there is one thing in common - this is the interface. Only in this case it is already a network connection - the router is physically connected to the computer network using wires with special connectors (ports), or a wireless connection, which in this case is not important.

Network interfaces of the router on the rear panel
The physical connection of computer network wires is made to these ports. There are at least two types of them – those “looking” at the outside world, that is, connecting to another network or provider (WAN port), and “looking” at their own internal network (LAN ports). The Linux operating system even assigned names to these ports - the WAN port is designated “eth0”, and the LAN port is designated “eth1”.
Wired interface
For a wired connection, you will need a network cable. There are several varieties of them - twisted pair, coaxial cable and optical fiber.

Network Cable Types
Each type has its own connector for connection, that is, a coaxial cable cannot be connected to a twisted pair port.
The most commonly used type is twisted pair - the golden mean between price and data transfer speed. The cable is connected to the corresponding port of the router (router network interface), and the other end to the computer’s network card (PC network interface).

Connecting to a computer
This connection procedure is no different for different types of conductor; they are of the same type.
Setting up WAN and LAN interfaces
Having connected the wires, let's move on to setting up the router. We familiarized ourselves with the procedure for logging into settings via the web interface at the beginning of the article. Having gone into the settings, go to the “Network” tab.

Setting up a wired network
By selecting a menu item, a submenu will open containing separate LAN and WAN port settings. We go to the appropriate subparagraphs and configure them in the way we need. Specific settings are not discussed in this article.
After entering the changes, be sure to click “Save” so that the changes are saved and activated.
Wireless interface
Wires are now becoming a thing of the past, and more and more is being devoted to the development of wireless interfaces. These include Bluetooth, infrared transmission and, of course, Wi-Fi. Wi-Fi is the future.
Through Wi-Fi, computers and routers are connected over the air using radio waves with a frequency of 2.4 GHz and 5 GHz (in development, 6 GHz). Radio modules and antennas are required for communication.

Wi-Fi router
When you turn on your router, it creates a wireless network that your computer needs to discover and connect to. The wireless network has a name, and according to the rules of good manners, a password for connecting to it.
All found networks are displayed on the computer desktop in the lower right corner.

List of detected Wi-Fi networks
By double-clicking on the name of the network, we will connect to it. But first you need to configure it in the router settings. How to enter Wi-Fi settings was described in the first part of the article.
Finally, a video lesson on how to set a password on the interface of TP-Link routers:
 (1 ratings, on average: 5,00 out of 5)

